Warung Bebas
Showing posts with label night vision. Show all posts

Wednesday, February 24, 2021

Reolink RLC-511WA WiFi Outdoors Camera Review – MBReviews

[ad_1]

The Reolink RLC-511WA is a WiFi outdoors-suitable camera that was built as an alternative to the PoE-powered RLC-511 so, if you were impressed by the image quality of the 5-megapixel sensor and needed the zoom ability of the camera, but a wired connection to the router is out of question, then Reolink has got you covered.

Indeed, the RLC-511WA has kept the same sensor that performed great when I tested the RLC-511 mostly due to the SuperHD resolution (both during the day and during the night) and the 4x optical zoom was quite fast which made the camera suitable for busy or dynamic places, but when using the WiFi connection, we may see a rise in latency (we will put that to the test). The 3D dynamic noise reduction is still there and the device features a rugged exterior to survive the outdoor conditions, but I noticed that Reolink has added some new elements, such as a spotlight that can activate when the camera detects movement and the support for dual-band WiFi.

reolink-rlc-511w

It’s not WiFi 5, but still a great addition considering that most (if not all other) budget-friendly wireless cameras are stuck with the 2.4GHz radio. Other than that, the support for NVRs and even some NAS devices remains on the RLC-511WA and, since we’re already aware about the potential of the camera, let’s have a closer look at it and see whether it’s going to be a great addition to the security aspect of your home or office and if the WiFi connection will have any impact on the image quality.

Design and Build Quality

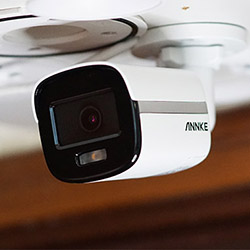
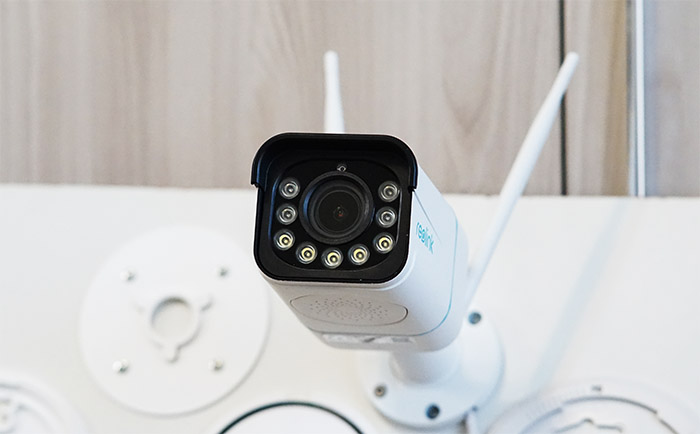
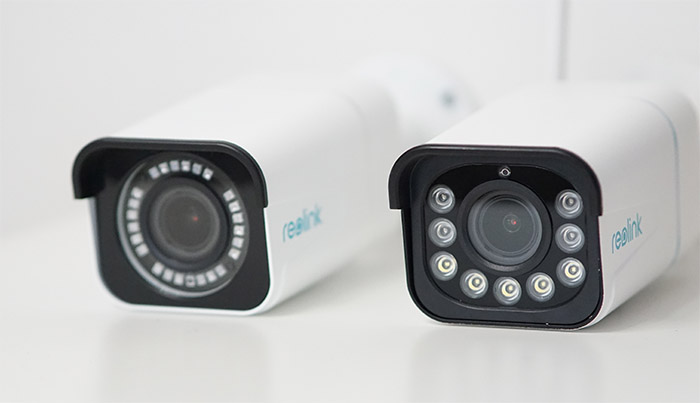
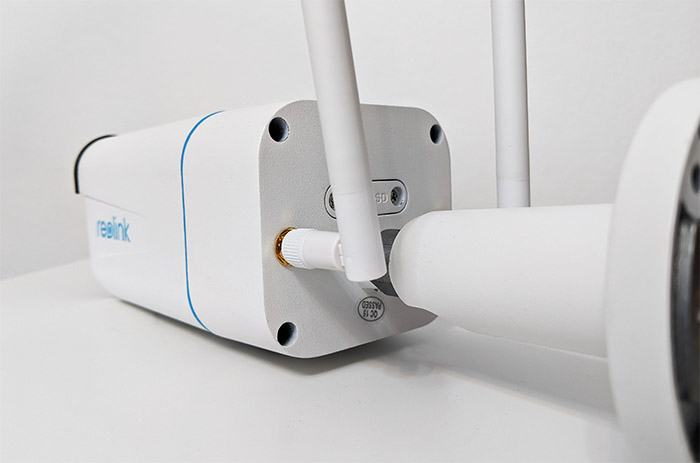
The Reolink RLC-511 was a fairly large outdoors-suitable camera (that made the Annke NC400 look like a miniature device) and the RLC-511WA is just as imposing, quickly gathering the attention of any passerby, especially due to its two rear-mounted antennas (they’re detachable). And that’s a good thing when it comes to security cameras since this way, the device can act as a proper deterrent, actively discouraging potential trespassers. (Did you know that even the camera sticker is sometimes enough to discourage people from entering your property?) So yes, the Reolink RLC-511WA proudly flaunts a rectangular metallic body that’s covered by a white matte finish (it’s worth noting that the RLC-511 has a smoother finish) and in terms of size, the device measures 3.0 x 2.83 x 5.44 inches without the stand (and 9.37 inches with the stand), which means that we’re no really dealing with the recycled case of the RLC-511.

reolink-rlc-511w
Left: RLC-511. Right: RLC-511WA.

And it’s also enforced by the bottom placed speaker (with the cover still made of metal – nothing is plastic here with the exception of the antennas) which can be activated to scare off any intruder – it does a very loud sound. The metallic enclosure is IP66-rated (same as the non-WiFi version) which means that the camera is protected against dust ingress and will survive powerful jets of water (which often happens during powerful storms). The RLC-511WA can be mounted in the open, just make sure that you have put in place the suitable protection measures against lightning and that the distance is not too long so that the connection with the router gets unstable. Temperature-wise, the device has been built to remain operational between 14 degrees F and 131 degrees F which makes it suitable for areas where the winter isn’t that harsh.

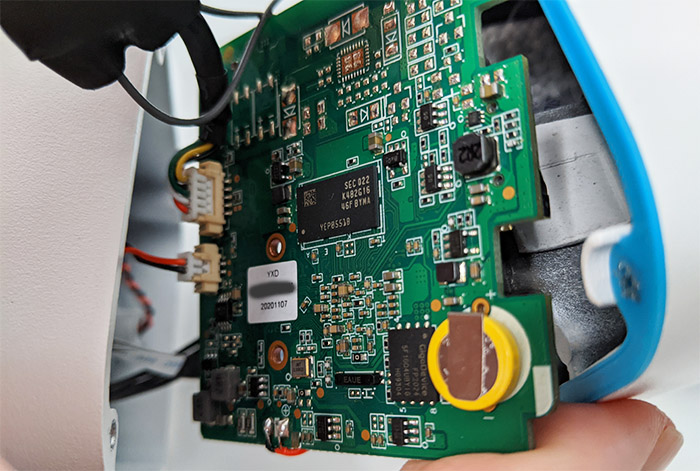
Considering that it seems to share most of the features of the RLC-511, I had to open up the case of the RLC-511WA and see if the internal hardware is the same as well (spoiler: it’s not, instead, it’s closer to the RLC-511W). The tear-down process is just as easy as on the other Reolink cameras and all I had to do was to remove the four screws from the back of the device and, after gently detaching the two parts, the layout is very different than on the RLC-511. Still, I could identify a Novatek NT98523MBG processor which is the same as on the RLC-510A and the RLC-520A and bit more powerful than the chip from the RLC-511.
I could also see 128MB of flash memory from GigaDevice (FP2024 5F1GQ4UBYIG), 256MB of RAM from Samsung (SEC022 K4B2G16) and a Ruimeng MS41929 IC which shows that the RLC-511WA is an upgrade over the RLC-511 in terms of internal components.

reolink-rlc-511w-internal-hardware

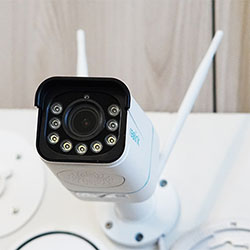
The front of the camera is occupied by a fairly large high definition lens and surrounding it, there are 4pcs IR LEDs, the spotlight and the daylight sensor (which triggers the night vision). At the bottom of the RLC-511WA, besides the fairly large speaker, there’s also a microphone, so it does support a two-way conversation. The stand is the same as with the RLC-511 which means that you’ll need to use the hex key (provided in the package) to manually adjust the angle of the camera and there’s now a white cable that gets divided into three separate smaller cables (with previous models, the cable was black). One of these shorter cables houses the Reset button (press and hold it for 10 seconds to return the camera to the default factory settings), the second allows you to connect the power adapter (and yes, you do get one in the box), while the last cable can be used to connect an Ethernet cable.

Of course, it does not support PoE, so it’s only use is to provide a more stable connection in case your router is not powerful enough to reach the camera. Lastly, Reolink has included a microSD card slot (covered by a piece of plastic that’s screwed into place) and, unfortunately, it uses the older tech, the one supporting only 64GB (still plenty for a couple of days of footage).

reolink-rlc-511w

Setup and Functionality

Since the Reolink RLC-511WA is not a PoE camera, the installation process is a bit different than other cameras from the RLC family. Well, not that different since you still need to find the right spot, drill the three holes, attach the device and route the cables. It’s better to check if your router can reach the camera before installing it and see if it can support the proper bitrate (for example, if the connection is unstable, you won’t be able to see the footage at maximum quality). If you are able, you can make use of an Ethernet cable and bypass completely the WiFi connection, although, at that point, the RLC-511 may be the better choice (mostly from the price tag point of view). After the hardware installation is done, download and install the Reolink app on your mobile device, give access to the required services (otherwise it won’t work) and then you will be greeted by an empty interface. Tap on the Plus sign to Add a new Device and it will require that you scan the QR code from the camera – thankfully, the RLC-511WA does have a QR code on its bottom, so scan it and wait for the Device initialization.

reolink-rlc-511w

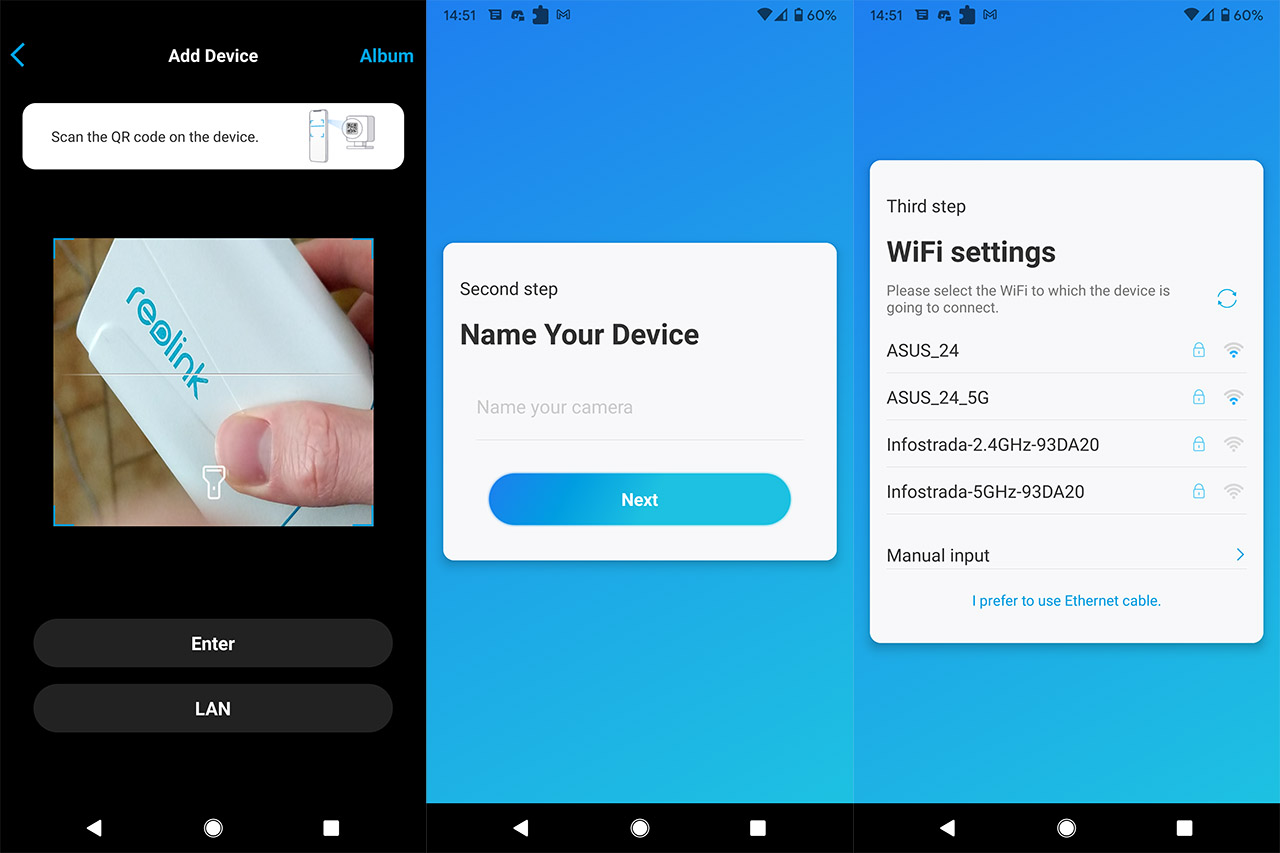
Afterwards, give your device a name, select the WiFi network that you’re going to use – it seems that the camera worked fine with my 5GHz network (even though it’s from an 802.11ax router) and after getting the message that the Initialization is finished, then you should get full access to the app. The main page will display the bitrate on the top left corner while the top half part of the display will mostly be occupied by the live view footage. The RLC-511WA has a max bitrate cap of 8,192 Kbps and, while on WiFi and the max image quality, I saw that the average was between 4,400 Kbps and 5,000 Kbps – depending on the time of day, it can go higher.

Pages: 12

Reolink RLC-511W

-

reolink-rlc-511w

Pros

  • Excellent image quality
  • Color night vision + spotlight
  • Smart motion detection
  • Speaker with loud alarm
  • Support for both 2.4 and 5GHz bands
logo

Mark is a graduate in Computer Science, having gathered valuable experience over the years working in IT as a programmer. Mark is also the main tech writer for MBReviews.com, covering not only his passion, the networking devices, but also other cool electronic gadgets that you may find useful for your every day life.


[ad_2]

Wednesday, February 10, 2021

Annke NC400 True Full Color Night Vision PoE Camera Review (I81HC) – MBReviews

[ad_1]

The Annke NC400 is one of the first PoE cameras to make use of the new NightChroma technology which has the role of rendering the night footage in full color. And yes, I know that a lot of other manufacturers have taken pride in achieving colored night vision, but the NC400 blows all of its competitors (in the same price range) out of the water due to its noise-less footage the there is little light and in case it’s pitch dark, the camera makes use of the built-in spotlight to maintain the zone of interest fully visible (and in color!).

Of course, the manufacturer has also focused towards offering an excellent day-time footage by relying on the 120dB true Wide Dynamic Range tech, as well as on 3D DNR and other image enhancement algorithms and, considering that this is an outdoors-suitable device, the NC400 is also build to withstand the elements.

annke-nc400-camera

I have recently tested another Annke camera, the C500 and I was impressed by its seamless ONVIF compatibility that seems to also be a part of the NC400 and there is, of course, PoE support for an easy installation. And that’s essentially what the users require from an outdoor camera, great image quality during the day and especially during the night, some flexibility in installation and a rugged exterior to survive outdoor conditions. Since the Annke NC400 seems to tick all the boxes, let’s have a closer look at this new device and see whether it’s the best security camera in its category.

Design and Build Quality

The Annke NC400 doesn’t drift too far from the traditional bullet-shaped camera, so, design-wise, it features a rectangular case fully made of metal and, apart from the front side, the device is covered by a white matte finish. There are some silver bands on the sides which I suspect will be a design signature for the new NightChroma camera series and I do like that they do serve a purpose above pure aesthetics (the teardown process has revealed that they keep the internal section in place). The Annke NC400 measures 6.3 x 2.7 x 2.6 inches, so it’s fairly compact and won’t attract too much attention towards itself, but don’t worry, that bright spotlight will make sure that the camera will make its presence known to any trespasser.

annke-nc400-side

Indeed, the front section is a bit more different than on other IP cameras which usually have the lens in the middle and the IR LEDs surrounding it. Instead, the NC400 has the front panel divided by a plastic cover into two sections: a larger one for the 4-megapixel lens and a smaller one for the spotlight. This cover can be removed to reveal a motion sensor and the user manual suggests that there is also a microphone (although I wasn’t able to see it in action), but no speaker, so the camera doesn’t support a two-way communication. As I did with almost all other camera that I tested, I decided to open up the case of the NC400 to see its internal hardware. To access (and remove) the four screws, you need to gently detach the front plastic side (it’s kept by some plastic hinges) and then use the hole on the bottom of the camera (yes, every element has a purpose on the NC400) to slide the internal section outside.

This way, we get to see three interconnected boards, each with it own set of circuits: I was able to identify a HST-0064SXCR Group-Tek 2017 transistor, 128MB of flash memory (SPI NAND) from Dosilicon (1952A DS35Q1GA-1B) which is quite a bit for a security camera and what seems to be 128MB of RAM (SEC025 K4B2616). I also saw the HK-2019-8 CD9291945 chip which I couldn’t clearly identify, but I assume that this is the SoC responsible for the image processing. Before putting it back together and closing up the case, I noticed a silicone seal which has the role to keep out water and dust, and, as anticipated, the Annke NC400 is indeed IP67 rated, so you can leave it outdoors without worrying about the elements. Obviously, take all the necessary precautions against lightning strikes (add some surge protectors), but other than that, the camera is perfectly suited for harsh environments: it will remain operational when the temperature ranges between -22 degrees F and 140 degrees F (more than enough for those Canadian winters).

annke-nc400-camera-hardware

The camera relies on a stand to be mounted on a wall (there are three screws inside the package) and you will have to manually adjust the angle of the device – use circular piece to fix it into place. From within the stand, there’s a cable that come through (it’s attached to the main body of the camera) and it divides itself into two pieces at the end: one for the DC connector and the other for the Ethernet cable.
Annke did not add any Ethernet cable into the package, so you will have to use your own, but there is a waterproof lid that you can use to make sure that no water will slip in between the connectors (I did like that you can use it on a cramped cable). Since the NC400 is PoE, you can only use an Ethernet cable for both power and data, but you can also use your own power adapter if you don’t have a PoE switch or PoE injector available. I have checked the NC400 (181HC) for a microSD card slot, but, just like on the Annke C500 (I51DF), there doesn’t seem to be one available.

Installation and Setup

Similarly to the C500, the NC400 is a wired-only security camera, so there is no WiFi connection available, but it’s fine since you can rely on a single Ethernet cable to power it on and to send data. There’s also the possibility to use a power adapter and connect the camera directly to a router instead of using a PoE switch or adapter. I would argue that the latter is the better option if you have more than one camera available and PoE has been fantastic for outdoors deployment since it keeps cables to the minimum and you don’t have to worry about feeding power cables outside your home. To mount the NC400, you will need to use the drilling template (from the box), make three holes and use the screws to fix the camera into place (and that’s it).

annke-nc400-camera-app

Afterwards, you should install the Annke Vision app (which is compatible with both Android and iOS), give it access to all the required media and services, otherwise it won’t work and then create a new account (does not require a phone number which is great). I already had the app installed so I simply logged into my existing account and, from the main page, I tapped on the Plus sign (from the top right) and selected Manual Adding since the camera did not come with a printed QR code. Next, I inserted the Serial Number, selected Camera (Wired) from the list, entered a Device Password to activate the camera, enabled the Annke Vision Service and created a Verification Code. That’s all that’s needed and you can change the name or go forward and check the user interface.

Software and Features

The app user interface doesn’t differ that much from when I used it with the C500, so, on the main page, I was able to see the live footage and I got the possibility to view up to 16 simultaneously added Annke cameras (it does make more sense on a larger screen). At the bottom, I got to choose the image quality which can be Basic, Standard or HD (the last one has a slight latency of under a second). Since it’s a wired camera, I suggest using the best image quality to clearly see all the details of the camera’s surroundings and, since the view angle is fairly large (102 degrees horizontally and 54 vertically), it does cover a lot more ground – a bit underneath the 120 degrees of the Argus 3. It’s worth noting that I did see a but of distortions towards the end and left side (the unwanted fish-eye effect), but it was still quite tempered. Next to the image quality icon, I could digitally zoom on the live footage (and move around the image with my finger), quickly capture a photo or start recording.

annke-nc400-camera

As for the image quality, using the max HD setting, it’s very similar to the Reolink RLC-511 during the day since both rely on the SuperHD resolution to deliver more detail and better colors, but the NC400 does get a slightly sharper image due to the 2560 X 1440p resolution. During the night, as I said in the introduction, I haven’t yet tested a camera that can rise up to the performance of the Annke NC400. As you can see from the images that I took with the app, the light sources aren’t overblown, there is very little noise (and that only far away) and it’s worth mentioning that the cars are about 200 feet away (the advertised range is only up to 100 feet, so it was an understatement). I have seen colored night vision before with other cameras (such as Argus 3), but it’s clear that the image quality is better and above what the human eye can perceive during the night.

Pages: 12

Annke NC500

-

Annke NC500

Pros

  • Excellent color night vision
  • PoE + DC support
  • Seamless ONVIF & RTSP integration
  • Spotlight
  • Rugged exterior

Cons

  • No microSD card slot
  • No Cloud storage available
logo

Mark is a graduate in Computer Science, having gathered valuable experience over the years working in IT as a programmer. Mark is also the main tech writer for MBReviews.com, covering not only his passion, the networking devices, but also other cool electronic gadgets that you may find useful for your every day life.


[ad_2]
 

mkseriesdigitalpoint Copyright © 2012 Fast Loading -- Powered by Blogger